

An audiogram is a graph of the softest levels at which your child can hear sound. It is a picture of the results of a test that is done by an audiologist. Your child’s audiogram will often be used to describe his/her hearing loss.


As the audiologist tests your child’s hearing, they will make marks using different symbols on the audiogram that represent the softest levels at which your child consistently responds. This level of sound is called the threshold. The location of each symbol will tell you how loud a certain pitch has to be for your child to hear it.
Many of the speech sounds are made in the pitches between 250 and 5000 Hz and are spoken at a loudness of 20 to 60 dB. Sometimes an audiogram will have shading on it that resembles a banana and falls in between pitch and loudness levels. This is put on the audiogram to show where speech sounds typically occur. This is where the term “speech banana” comes from. If the audiologist fits a hearing aid on your child, they will try to make sure that your child can hear sounds in this area. The pictures on the audiogram are sounds that present themselves at certain decibels. For example, the picture of the piano on the audiogram is the sound level that a piano is at.
The audiologist may also use the audiogram to chart what sounds your child can hear with hearing aids on. The softest sounds your child can hear with hearing aids is called the aided threshold. Many times the letter A will be the symbol used to represent aided thresholds. Ideally, these A’s will be within the banana lines.
What do the symbols and drawn lines mean?
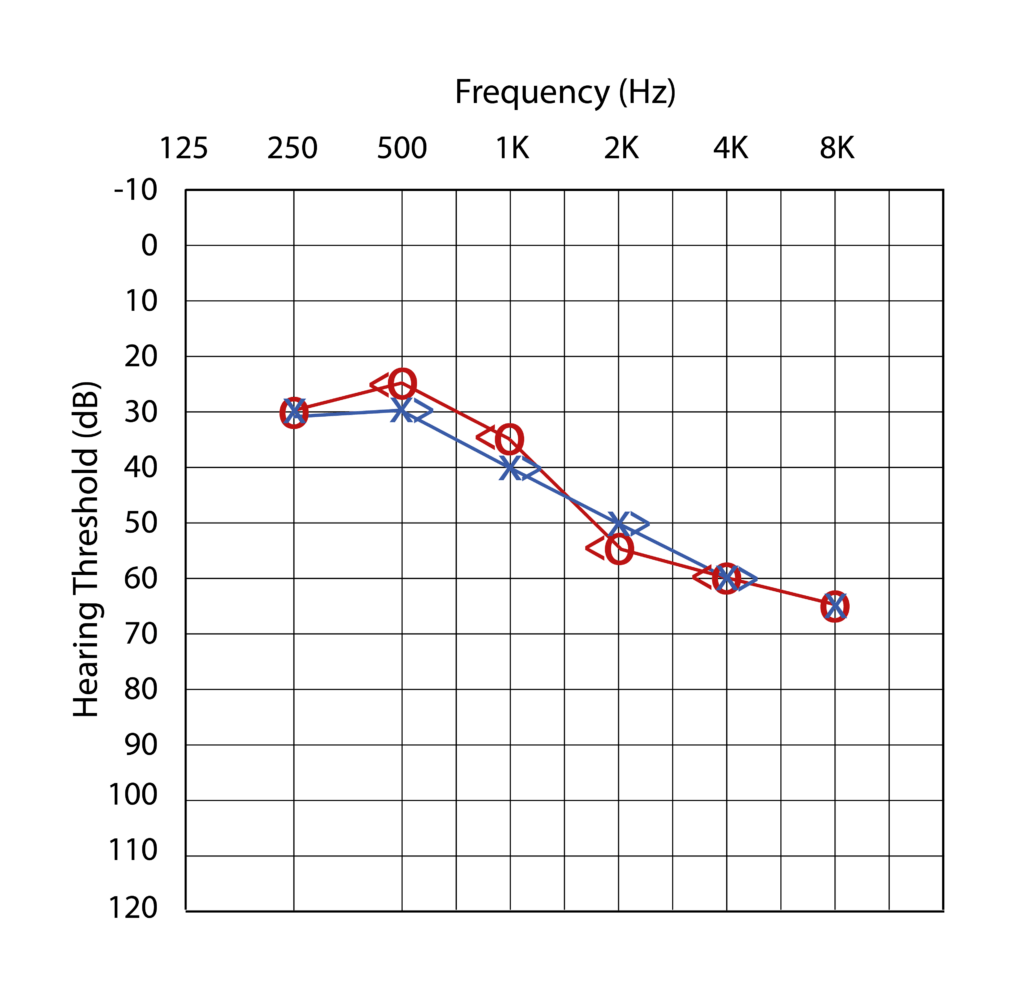
If your child is tested with earphones, it is called Air Conduction Testing. Because sound is presented to each individual ear, information can be gathered about hearing in each ear, separately. The symbols used to represent Air Conduction testing are an “X” for the left ear and an “O” for the right ear. Sometimes colors are used for all of the different symbols: red for the right ear and blue for the left ear.
If your child does not hear the sound at the loudest level of the audiometer (the machine used to test hearing), it may be indicated several different ways, with a NR (no response), a squiggly downward line or an arrow downward from the X or O.
If your child is tested using a bone conduction vibrator (a vibrating piece of plastic placed behind the ear) then brackets [ ] will be used. The symbol > is used to show the left ear results and < for right ear.
After the audiologist has information about various pitches, they will connect the symbols to make a line on the graph for each ear. This line is the configuration of the audiogram. Configurations vary due to each child’s individual hearing loss. Sometimes configurations go somewhat straight across. These are called flat hearing losses. Some configurations will angle downward, either gently or sharply. These are called sloping losses. Professionals may use these configurations to describe your child’s hearing level. Given the varied reasons for hearing loss in children, each audiogram is unique, reflecting a multitude of factors.
Objective tests of hearing do not require active participation from the child and are often very helpful in assessing hearing levels .
How it is done: A small probe is placed in the child’s ear canal. A sound, generated by the testing equipment is sent to the cochlea (inner ear). If the hair cells in the cochlea are functioning normally, they generate an otoacoustic emission that is generated by the testing equipment.
What it will show: If an emission is present, it suggests normal cochlear function. If an emission is not present, then further testing is needed. Generally, children with typical hearing or mild hearing levels will have otoacoustic emissions present. Otoacoustic emissions alone are not enough to diagnose typical hearing.
Who is it for: This test is used for infants, for children who cannot respond to other types of hearing tests, and for children with disabilities. OAEs can be used regardless of a client’s age at testing; as another way to cross-check test results; to help diagnose auditory neuropathy and to monitor hearing when an individual has had noise exposure.
Different types of testing may be known as: Brainstem Audiometry Evoked Response, BSER, BAER, ABR, ASSR
How it is done: This tests hearing from the level of the outer ear through the lower brainstem. This test can be done if the child is either sedated or asleep. Electrodes are attached to the child’s head and earphones are placed on the child’s ears. Sounds are played through the earphones and the electrodes measure how the child’s brain responds. This test gathers specific information about the child’s hearing at different pitches and loudness levels. This test is completely painless.
What it will show: This test gives a close approximation of the child’s hearing sensitivity.
Who is it for: This test is used for infants, for children who cannot respond to other types of hearing tests and for children with severe disabilities.
Also known as: Impedance testing, immittance testing, or tympanometry
May also include: acoustic reflexes
How it is done: A probe is placed in your child’s ear and a signal is presented. There may be a change in pressure depending on what information the audiologist is trying to gather. The signal bounces off the eardrum and back to the probe. It only takes between 3-30 seconds per ear.
What it will show: Tympanometry will chart the way sound enters into the middle ear which shows how the middle ear is functioning. It can help determine if there is a hole in the ear drum or if there is fluid behind the eardrum. This is part of one test that audiologists use to assess eardrum movement, but is not always clear-cut.
Who is it for: Any child.
Purpose: To get a background of the patient and gather information to address the child’s specific needs effectively.
What your child will feel: Just a conversation! They will feel nothing!
What your child will do/hear: Oftentimes, the child will sit or play with toys in the room while the audiologist speaks to the caregiver. Sometimes when the child is old enough, the audiologist will ask the child some questions!
The audiologist will take a look into the ears of the child with a light called an Otoscope!
Purpose: The audiologist will take a look into the ears of the child with a light called an Otoscope! This is for observing if the ear canal and eardrum look healthy.
What your child will feel: The child will feel something in their ear, but nothing should be painful-it is just a light!
What your child will do/hear: The child will sit still for a few seconds
Purpose: A test used to assess middle ear function and status.
What your child will feel: The child will feel a slight non- pressure in their ears as if they are going up in an elevator or airplane.
What your child will do: Sit quietly and remain still for a short period of time.
Purpose: To determine the integrity of the auditory system by evaluating the pathway.
What your child will feel: The child will typically feel a brief sensation of pressure or fullness in the ears.
What your child will do: Sit quietly and remain still for a short period of time.
What your child will hear: The child will hear brief, loud tones or sounds.
Purpose: A test to evaluate inner ear function.
What your child will feel: A small probe in their ear (non-painful!).
What your child will do: Sit quietly and remain still for a short period of time.
What your child will hear: The child will hear “beeps,” tones, or clicks – often described as music to the child.
Purpose: Measures hearing function and determines your child’s thresholds for hearing sensitivity. Typically used for older children
What your child will feel: Headphones over their ears or in their ears
What your child will do: The child will be given directions to follow such as raise your hand when…, press the button when.., etc.
What your child will hear: Your child will hear “beeps” or “tones” in each ear
Purpose: These tests are all methods used in pediatric audiology to assess hearing in young children who may not be able to participate in standard audiometric testing.
What your child will feel: Depending on the information needed, the child may or may not have headphones in or on their ears.
What your child will do: Depending on the specific test, the child will be observed of their behavioral responses to noise, turn their head to the sound source, or be conditioned to perform a specific action (i.e. ball in bucket).
What your child will hear: The child will hear various sound stimuli in order to capture the child’s response reliably.
Purpose: These tests will give us a better understanding of how well your child can understand speech at various levels. There are different speech tests designed specifically for your child’s age group.
What your child will feel: Depending on the information needed, the child may or may not have headphones in or on their ears.
What your child will do: depending on the test, point at pictures of words or repeat words.
What your child will hear: Dependent on test, but either sounds, words, or sentences being presented.
Purpose: The purpose of an ABR test is to assess the auditory nerve and the brainstem’s response to sound stimuli. There are a multitude of reasons why a child would have an ABR performed, such as a newborn hearing screening, a diagnostic assessment, neurological assessment, and more!
What your child will feel: The child will feel electrodes on their face. These are typically stickers or by using a gel, which are not painful! There will also be headphones or inserts on the child.
What your child will do: The child will most likely be in a natural sleep or sedated during this test.
What your child will hear: Clicks and tones will be presented to the child’s ears.
PHOTO CREDIT: https://www.nhstayside.scot.nhs.uk/OurServicesA-Z/Aud#043B61iologyandBalanceServices/PROD_212237/index.html
Taking a child to the audiologist can be a new and potentially intimidating experience for both the child and the parent. Here are some tips to help make the visit smoother.
Entering the sound booth, you might notice several pieces of equipment you’re not used to seeing, all with wires hanging around. Here’s some helpful info to help you get used to the equipment you’ll encounter during the tests: A sound booth for audiology testing is like a quiet room that helps doctors check how well someone can hear. It’s built to keep all outside noises out so the tests are accurate. Inside, the walls absorb sounds, so there aren’t any echoes that could confuse the results. Booths come in all shapes and sizes depending on the clinic setting! Usually, inside the sound booth, you’ll see two sides separated by glass. On one side, there’s where the audiologist sits during the tests. On that side, there will be an audiometer.
What is a booth?
A sound booth for audiology testing is like a quiet room that helps doctors check how well someone can hear. It’s built to keep all outside noises out so the tests are accurate. Inside, the walls absorb sounds, so there aren’t any echoes that could confuse the results. Booths come in all shapes and sizes depending on the clinic setting! Usually, inside the sound booth, you’ll see two sides separated by glass. On one side, there’s where the audiologist sits during the tests. On that side, there will be an audiometer.
What is an Audiometer?
A piece of equipment used by an audiologist to generate the noises heard in the booth. The control dashboard for audiologists!
What Headphones?
The headphones your child uses during their audiology appointment depend on the goals of the visit that day. Factors like their age, the specific tests being done, and any ear-related issues, such as infections, help the audiologist decide which headphones, if any, are best to use. You may see…
What is Bone Conduction?
Bone conduction is a way of hearing sound that bypasses the outer and middle ear and directly stimulates the inner ear (cochlea) through vibrations in the skull bones. Bone conduction is used to distinguish the type of hearing loss the child has. To do so, a special headband is placed on the child’s head. The headphone may feel or look awkward, but this section of the test is usually pretty quick.
What is a VRA System?
VRA (Visual Reinforcement Audiometry) system is a fun setup used during kids’ hearing tests. It includes speakers or headphones and toys or pictures that light up or move when your child hears sounds. This can look like toys in boxes that light up when needed, or more modern setups might include TVs.
We hope you will consider making a gift to support these children. Thank you!
Sign up to be the first to know about new FHSR resources, programs, and events.
FHSR is a qualified 501(C)(3) tax exempt organization. Tax ID number 36-6082810.

FHSR’s MARCOM Gold Award-Winning Website was developed in collaboration with Carlson Integrated, LLC.
MarCom Awards is an international creative competition that recognizes outstanding achievement by marketing and communication professionals. MarCom Awards is administered and judged by the Association of Marketing and Communication Professionals. Judges are industry professionals who look for companies and individuals whose talents exceed a high standard of excellence and whose work serves as a benchmark for the industry. There were over 6,000 entries from 41 countries in the MarCom Awards 2021 competition.